In the Microsoft 365 Compliance Center, new and old solutions have been grouped together into new categories. Microsoft built out a number of solutions in Office 365 incrementally, and this re-organization groups them together by business processes, hopefully in a way that is meaningful to users and administrators of M365 Compliance.

One of these categories is called Discovery & Response, where there are currently (December 2019) three solutions:
- Data Investigations
- Data Subject Requests
- eDiscovery
The specific business cases for each vary, but what unites them as a category is that in each, you are going to discover content that is related via a case or request, and need to respond, typically by producing that information, or information about that content, either to another department in your organization, or a third party.
Lately, I’ve had several customer engagements focused on Advanced eDiscovery, which is part of the Discovery and Response solutions in M365. Because Data Investigations and Data Subject Requests rely on the same underlying search process, I’m going to show how to build a better search in Advanced eDiscovery, and then show what’s different in its sibling services.
Discovery & Response Fundamentals
While each of these solutions varies in detail, fundamentally they’re all organized as follows:
- Search – this is casting the wide net.
- Organize search results into logical containers*.
- Query search results.
* Data Subject Requests does not have logical containers, but you can adjust your search terms, and have multiple searches within a single DSR case.
The analogy I like to use, starting with the “wide net”, is to imagine you’re on a fishing trawler, and the first thing you do is put out a net designed to catch certain kinds of fish. You might do this a few times, maybe looking for different kinds of fish. The catch from each net get put into different bins in the hold of the ship, perhaps by market or date, or combinations thereof. Lastly, you’ll search through those bins looking for the best fish to send to market.
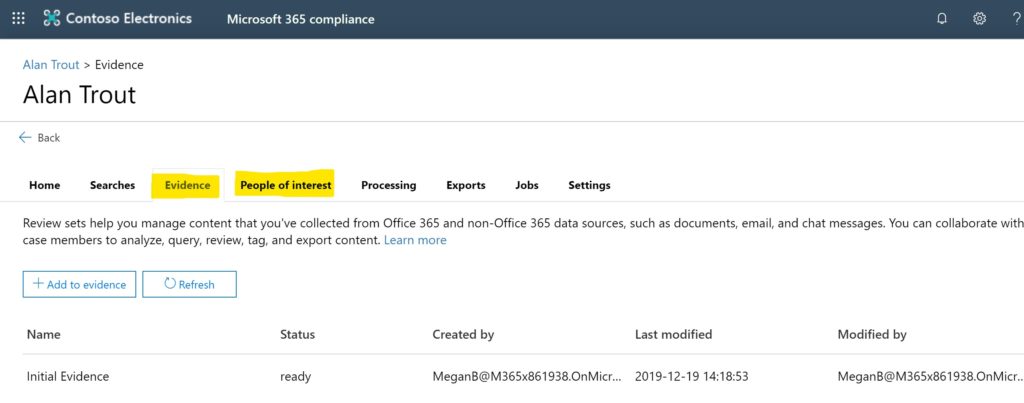
Each casting of the net is a Search, and they can take anywhere from a few minutes to a full day to run. Following each Search, you’ll organize the results into separate logical containers. In Advanced eDiscovery, these are called Review Sets, while in Data Investigations they’re called Evidence. It’s in this step that results of your Search are indexed, which makes subsequent queries within the Review Sets/Evidence much faster than the initial Searches.
Why is Discovery & Response set up this way? If I were to pick one word, it would be indexing.
Microsoft 365 can search against all content in M365, but that search takes time. In order to run effective queries, search results must be indexed. In eDiscovery and Data Investigations, there are two places that gets defined.
First, one or more users are identified to have their workspaces indexed; generally their mailbox and OneDrive. Depending on the service, they may be referred to as a Custodian, Person of Interest, or Data Subject. Including a user in one of these categories means that their workspaces will be indexed.
Second, in a Search, Office 365 will find all the content it can related to your Search, which may take a few minutes, or as long as a full day. The results of this search can be organized into a logical container (Review Sets or Evidence), at which point the content is indexed. This content can include not only your Custodians/People of Interest, but other workspaces such as Teams chats, SharePoint, and non-Custodian mailboxes.
It’s queries against this indexed data that are the building blocks of any discovery process. Furthermore, within a Review Set or Evidence, additional tools for tagging, redacting, and otherwise marking up query results are available to investigators. Additional markup is not available in Search. Review Sets and Evidence are additional markup spaces that can associate markup with content without affecting the original content.
Search, Organize, Query. That’s at the core of Discovery and Response.
(Advanced) eDiscovery
While I’m showing screenshots from Advanced eDiscovery (AED), for the purposes of search, the same will hold true for Core eDiscovery (CED). The main differences between the two are AED’s machine learning capabilities for filtering out unrelated or duplicate content, and its ability to preview and display statistics from Search results The fundamentals remain the same.
In the following examples, I’ve already created my case and defined my custodians – the people with custody of the data I want to search. I didn’t bother sending out communications, and if any other workspaces need to be on legal hold, I’ve done that as well. We’re going to focus on Searches and Review Sets.
Search
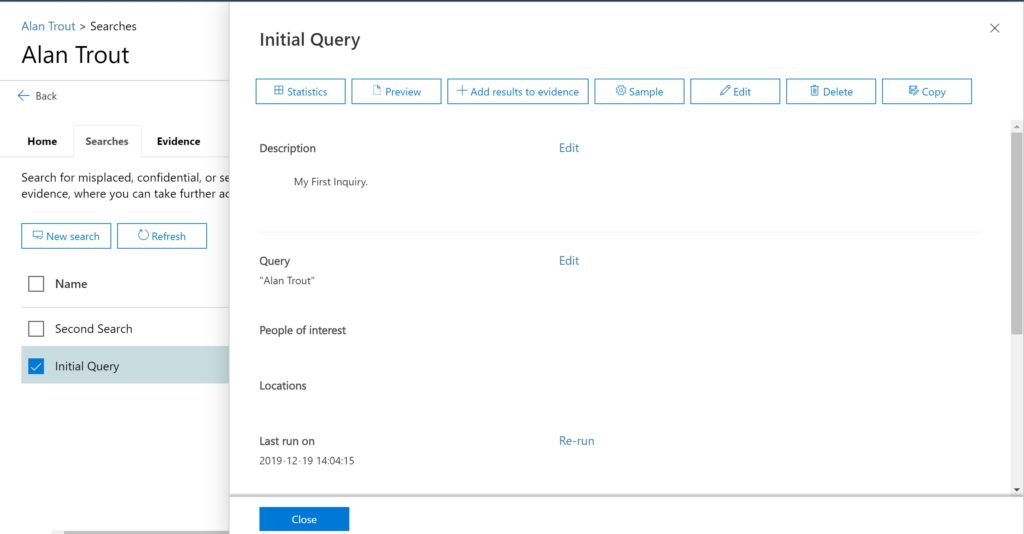
A Search is the wide net – it’s the first grab at all the content in the environment based on simple or complex criteria. You can have multiple searches, but there are limits on the number of searches a single user can have active at once.
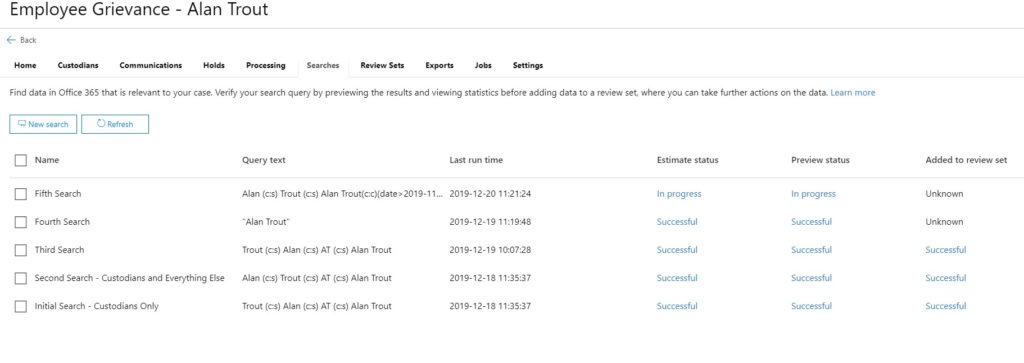
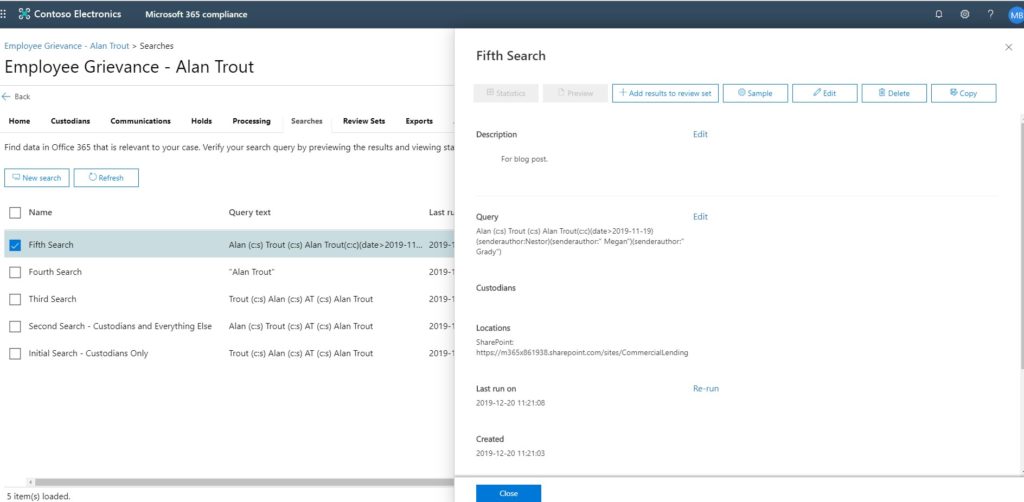
Once a Search is started, it can take a while to run – up to a day, depending on volume and scope. You can view the status of a Search under the Searches tab in a case.
You can re-run searches, and you can change the scope and criteria. In Advanced eDiscovery, you can also see statistics on your results, i.e. which service and document type have the most or fewest hits, and you can also pull out a statistically significant sample to review the results – this can help ensure you’re on the right track with your search.
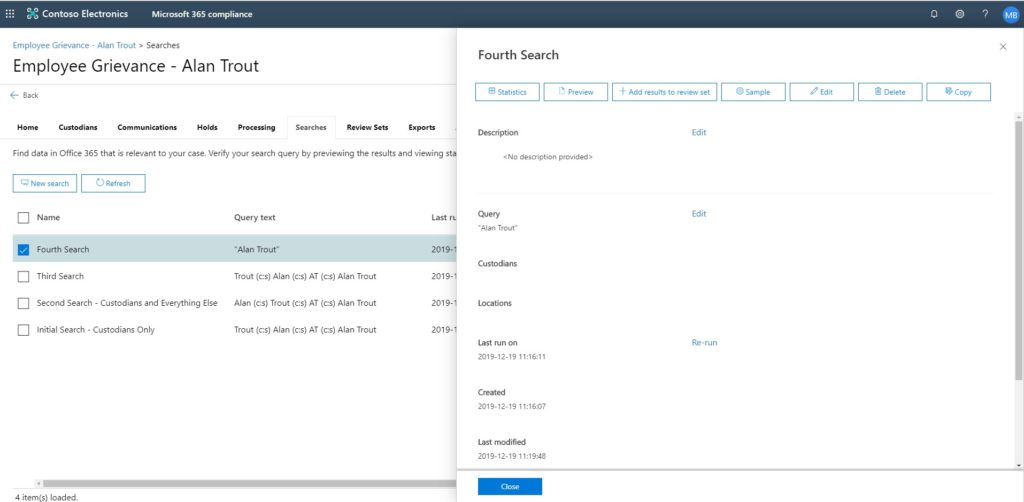
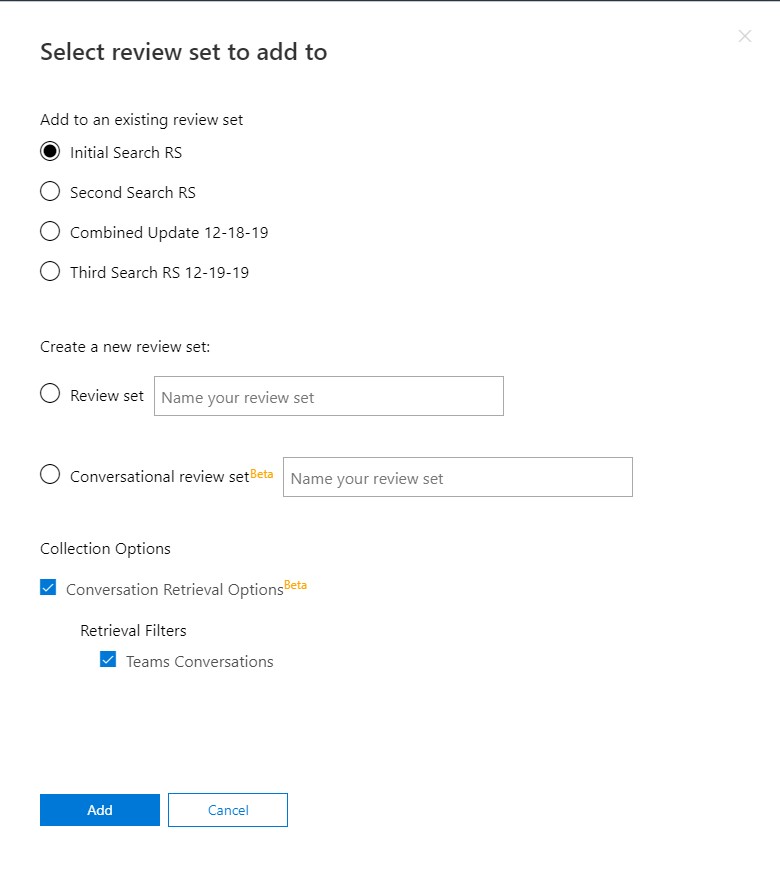
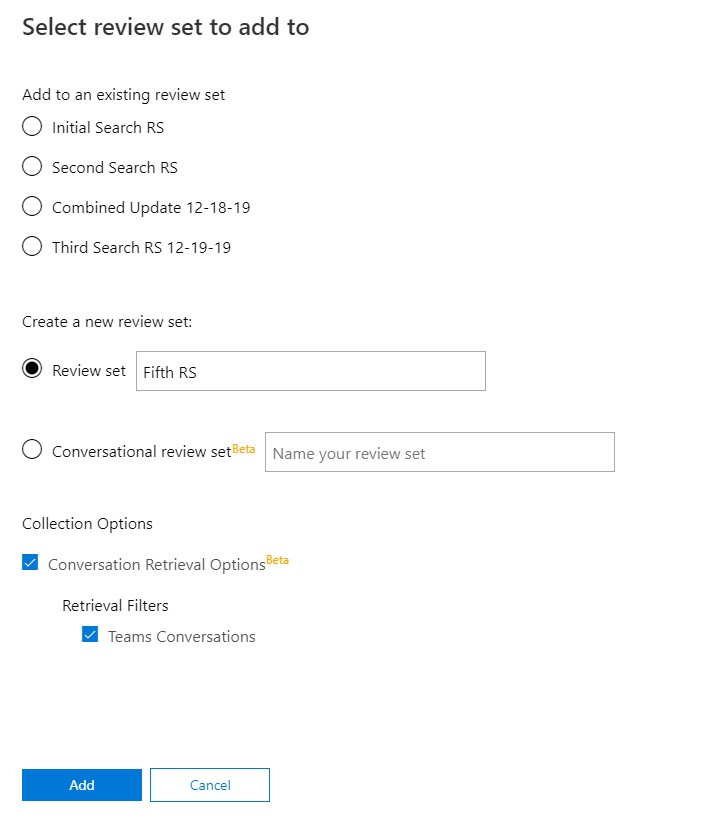
Once you’ve completed your search, you can add its results to a Review Set. Multiple search results can be added to a single review set. You can add to an existing Review Set, or create a new Review Set on the fly.
You don’t have the sampling statistics options with Core eDiscovery.
Review Set
Formerly known as Working Sets, a Review Set is a logical container for search results. It’s a space to collect the results of one or more searches. Review Sets are how content is organized for further analysis. Review Sets might map to different areas of the investigation, or to different investigative teams, or by some other criteria. You can have up to twenty Review Sets in a case.
Data Investigations refer to Review Sets as Evidence.
Data Subject Requests do not use Review Sets.
When Search results are added to a Review Set, they get indexed, in order to make queries within the Review Set faster. This can take a few minutes, so be sure to wait until that process is complete before expecting any query results.
Once your search results are in a Review Set, you can query those results. This is often the biggest leap for customers, because it can seem like they’re searching the results of previous searches.
This makes a little more sense if you keep in mind Review Sets are an intermediate space to organize the work, and that multiple search results can be placed in a single Review Set.
Review Sets are also where tagging, redaction,and other markup tools live. Typically, Review Sets are where the legal or other investigative professionals perform their work. However, to keep focus, I’m not going into those tasks in this post.
It’s worth remembering that since non-365 sources are supported, a single search may not be sufficient to discover all content. In a case where some content needs to be discovered in email and SharePoint, but additional content is on one or more on-premise file shares, there will be at least two searches: one for 365 and the other for on-prem. The results of those two searches might get added to a single Review Set, or they might get added to individual Review Sets.
Search Query
Once content has been organized into one or more Review Sets, the real work can begin, with search queries within the review set.
Multiple queries can be created within a review set. While it’s common to think of iterative queries being created to refine results, more commonly there are multiple queries to support finding different information, or different kinds of information.
For example, within one line of inquiry, you might want all documents with specific keywords sent between three custodians from June through August or a given year. A separate line of inquiry might have to do with all emails sent from one specific custodian to a competitor, or a contractor known to be loose with its handling of data.
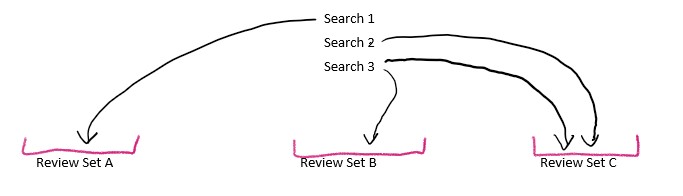
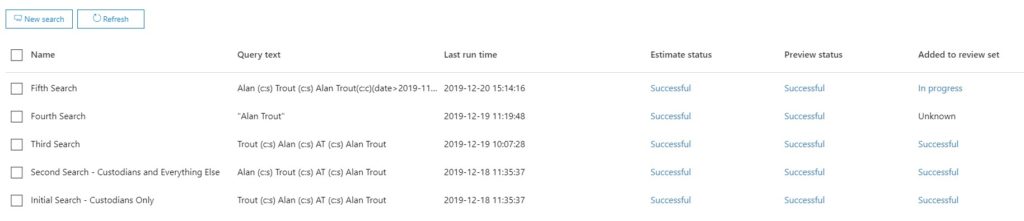
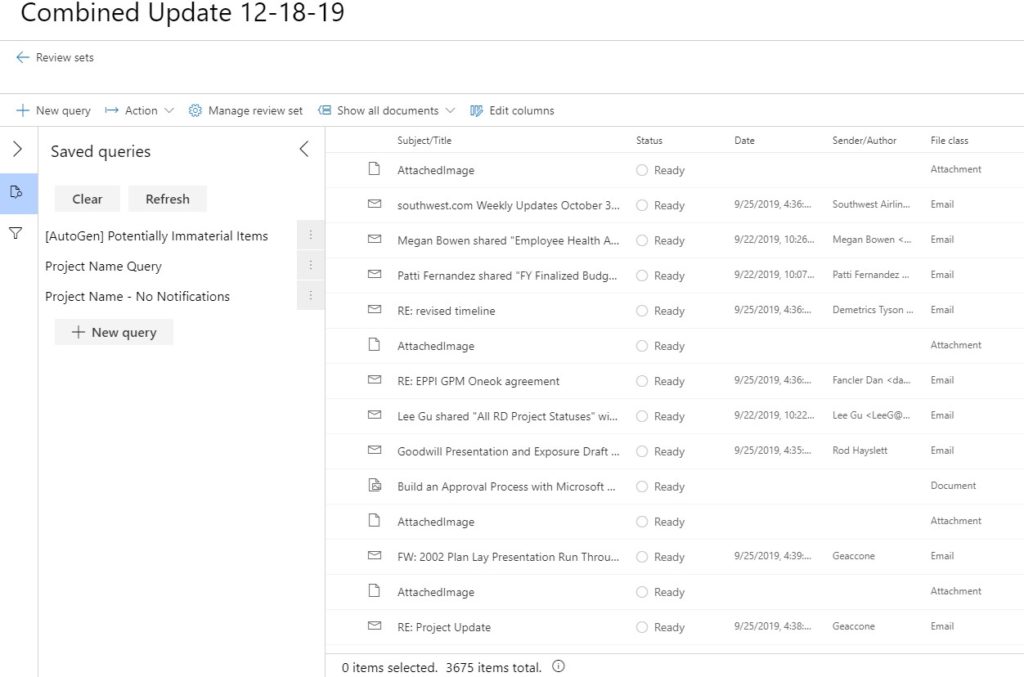
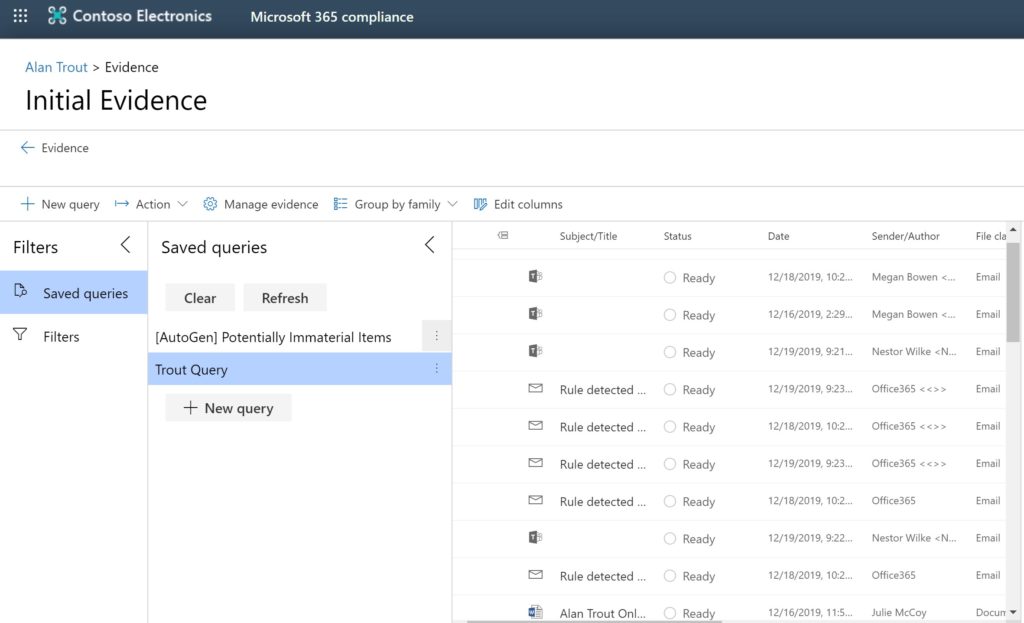
Here’s a triptych of iterative queries. In the first picture, I have no queries, so I see all 3,675 results from the initial search I used to populate the Review Set.
That’s way too many results, so within the Review Set I’ll create a query. In this example, I’ll search for any content with the word, “wumpus”.
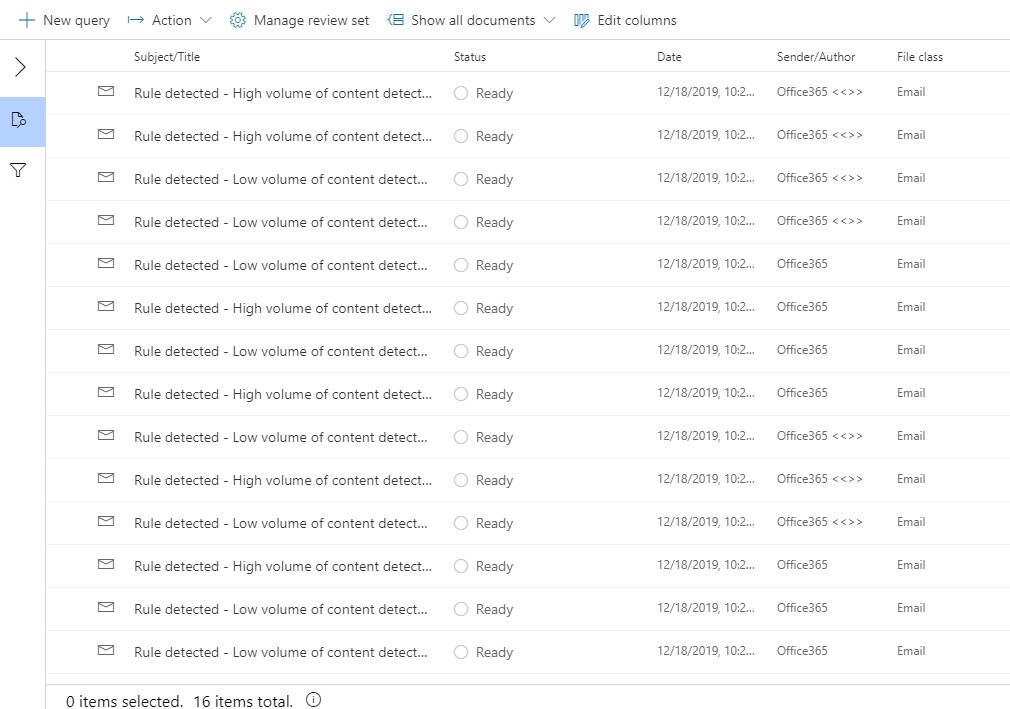
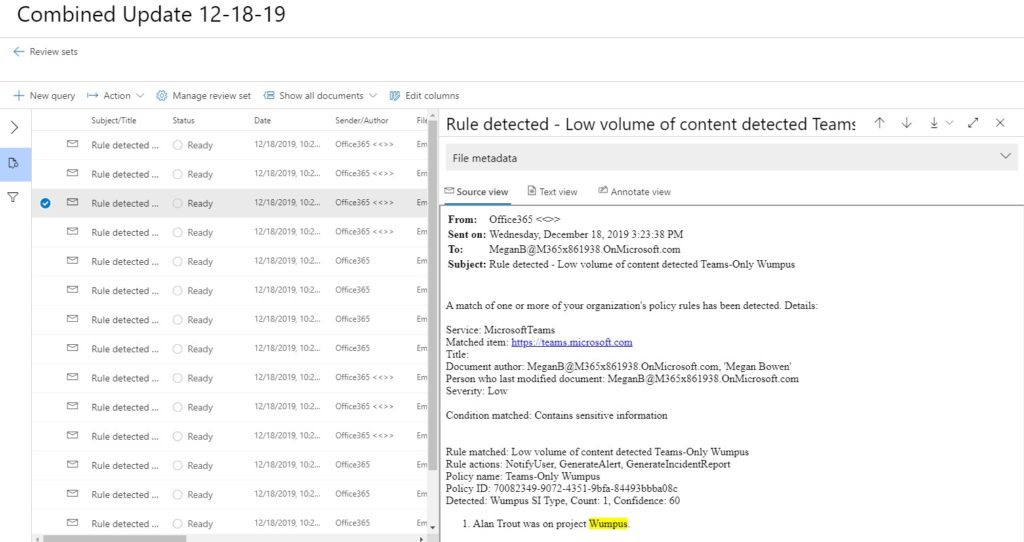
Let’s say that’s still too many results – and I notice that the subject of most of these results starts off, “Rule detected”. That’s because my initial search included the mailbox of an administrator who receives notifications of sensitive data, which also happens to be the subject of my search. In this case the sensitive data is in each notification email. My query caught notifications of the word wumpus, along with original content containing the word itself.
To address that, I’ll refine my query by adding a term “And Contains None Of “Rule Detected”.

The brings my data set down from sixteen to two – statistically far more manageable.
In real life, multiply all of these results by a hundred, and I’ve gone from a wide net of 367,500 in my initial search, to 1600 items in my first query, down to 200 in my refined query.
Top Tips for Searches and Queries
Whether at the Search level or the Query level, it’s worth spending time learning the logic of Keyword Query Language (KQL, not to be confused with Kusto Query Language). The key points are to know the operators that connect terms (AND, OR, NOT, NEAR, ONEAR) as well as the condition phrases in each term – for example “Contains all/some/none” for Keywords.
Queries can be built out in the graphical interface, but more sophisticated queries can be built out using the syntax spelled out in the Microsoft docs article linked above.
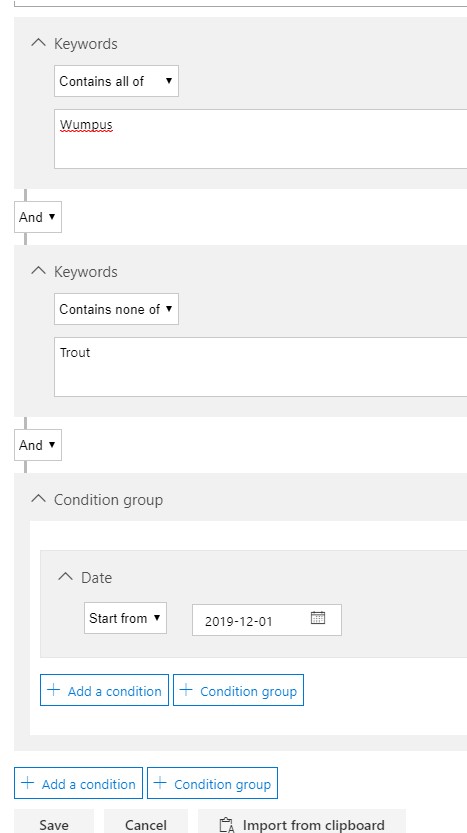
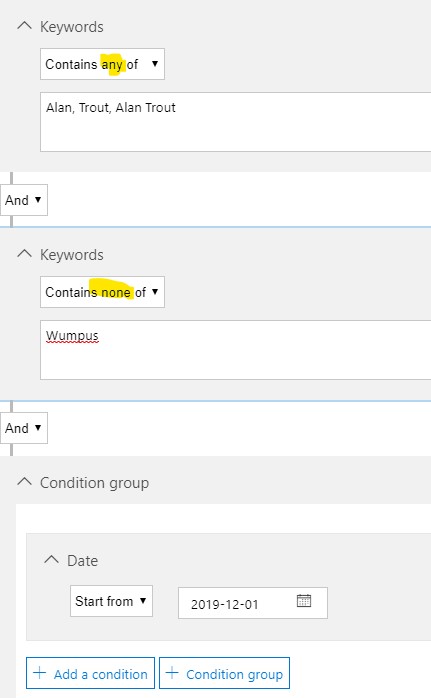
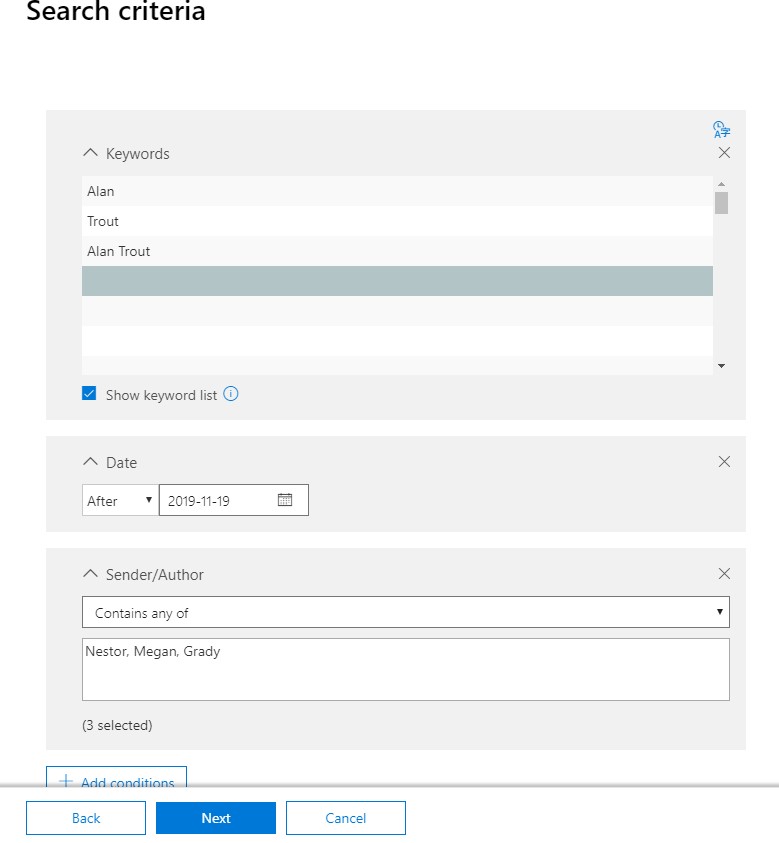
I built out several simple examples in my demo environment, mainly variations on “Alan”, “Trout”, and “Alan Trout”, as well as my secret project word, “Wumpus”.
A real-life example might be: show me all emails sent by Alan Trout with the name of our secret project in it.
A second query might be, show me all files in SharePoint or Alan’s OneDrive with the secret project in it.
A third query might be “show me all content sent or authored by Alan with the Level 3 Compliance Label, After August 1 but before November 30.
Remember, search queries are located in a review set, and review sets are where investigators do their work. Additionally, a search query is running against information that has already been indexed, and is pretty quick. The initial searches that populated our Review Sets might have taken hours, even up to a day, to run.
TL;DR
- Run one or more Searches to find relevant content. These may take up to a day to run.
- Organize Search results into a Review Set.
- Within a Review Set, use multiple Queries to further refine and focus your results.
Data Investigations
Data Investigations are currently (December 2019) in Public Preview, with the usual disclaimers that it should not be used in production, and Microsoft may end the Public Preview at any time without notice.
Data Investigations is a solution for finding sensitive or malicious data, and then optionally deleting it. A typical scenario would be data spillage, where perhaps an employee accidentally shares sensitive data with someone or to a location that shouldn’t see it.
For example, someone in HR intends to forward documents related to an employee grievance to Jane Smyth, but in their haste accidentally sends to Jane Smith. They report the mistake, and now the company needs to see if the memos made it anywhere else – forwarded to others, saved to OneDrive, saved to SharePoint, etc.
Just as with eDiscovery, Data Investigations is built around the notion of a case, and within that case are multiple searches that get sorted into one or more logical containers for further inquiry. In Data Investigations, these containers are called “Evidence”. Additionally, instead of “Custodians”, we have “People of Interest” to index workspaces associated with specific people – their mailbox, OneDrive, or both.
Otherwise, Search, organizing, and Queries work the same.
Search is the same:
Queries are the same:
A query within Evidence is the same as in a Review Set. If you squint, you’ll see the description of Evidence starts off, “Review sets help you . . .”.
So: everything that I wrote about the discovery process in eDiscovery applies here:
- Search is your wide net.
- Search results get organized into logical containers, called Evidence.
- Multiple queries in Evidence fine-tune your investigation.
Data Subject Requests
Data Subject Requests (DSR) is another new service, also in Preview, that is built on the same fundamental discovery processes as eDiscovery. As it is still in Preview as of December 2019, the usual caveats apply.
Additionally, unlike eDiscovery and Data Investigations, DSRs do not have an interim organization step like Review Sets or Evidence. DSRs can have multiple Searches, and they can be edited and re-run, but they don’t get subsequenty pored over.
I can only speculate that the reason for that is the purpose of a DSR. In case you’ve not heard, Data Subject Requests are a term defined in the GDPR (General Data Protection Regulation), the European Union’s landmark data privacy law, and the concept is commonly used when discussing data privacy.
The basic idea is that a data subject – a person that data is about – has a right to see all data that an organization has about them. An easy example would be to see all the information your bank has about you. Another would be what data Facebook has about you.
In DSR, Instead of Custodians or People of Interest, there’s only the Data Subject. While the assumption is that only one name will go there, it’s possible to put in multiple. Regardless, the underlying function is the same: the workspaces directly associated with the Data Subject will be indexed.
As is the case with eDiscovery and Data Investigations, making someone a Data Subject indexes the content directly related to them – mailbox and OneDrive. You can search other locations, but the query will take longer.
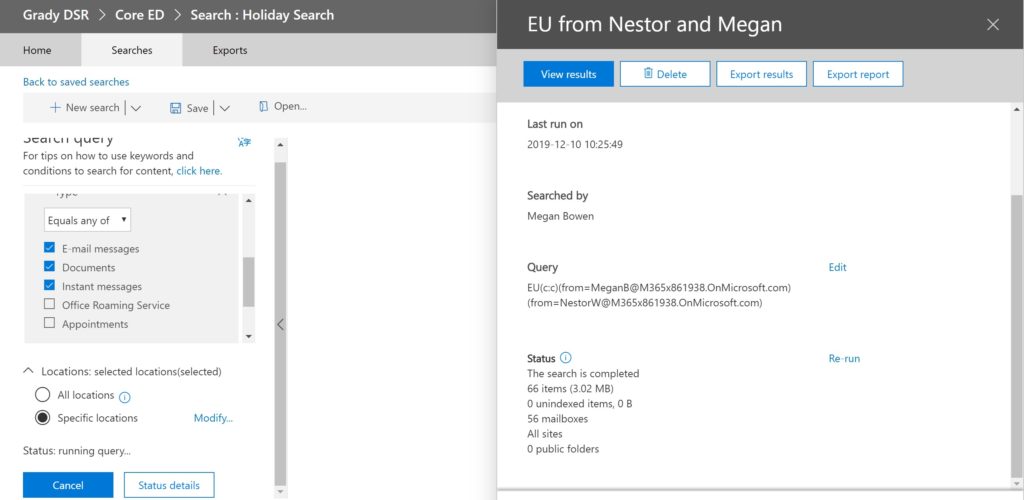
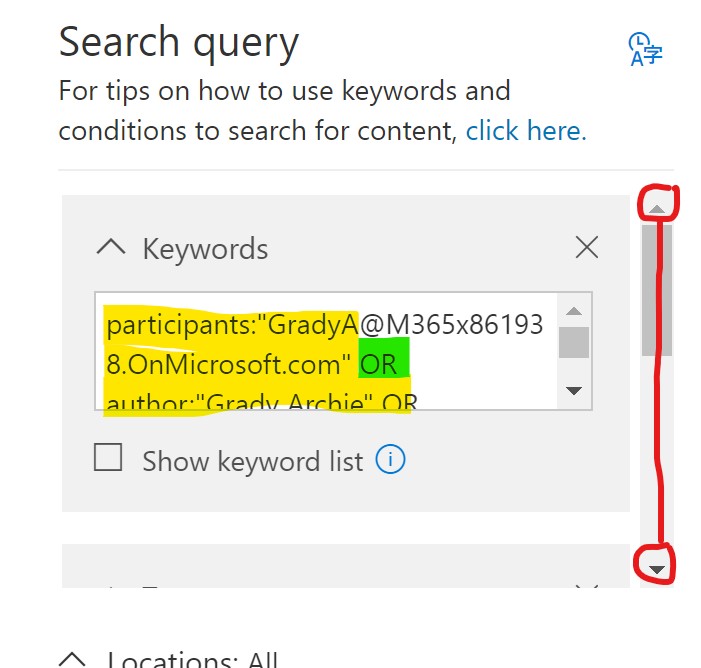
By default, the KQL string for finding that participant is automatically entered into the Keywords of a Search. You can modify that when you View Results. This will bring up the Search Query blade.
Look closely at the search terms of this query. You can scroll through and stack more terms. Below is an example from another query, and I’ve highlighted the scroll bar, as well as the KQL phrasing to look for or data subject as either a participant or author.
Discover and Response: Choosing a Tool
I decided the write this post after an interesting call with a European customer. The pre-call notes indicated they were interested in “Data Subject Requests” but once we were talking, it was clear that Advanced eDiscovery was what they were actually using, and what they really needed was a better understanding of the discovery response I’ve outlined above.
On the first point, a DSR is a process to discover information related to a data subject and hand it over to them. That’s what the new DSR solution does, and it does it quite well. However, if what you’re really doing is, for example, investigating a data breach or, for another example, investigating an employee grievance, then you not only need to find data related to a data subject, but there may be multiple data subjects, and your investigators will need a way to mark up their content and organize their work in a way that is meaningful to them.
On the second point, if you’re a non-technical person tasked with uncovering all content related to an investigation, your first thought is, quite reasonably, to enter some search terms and call it a day. However, this ignores all the tools Microsoft has built in to AED and Data Investigations to not only refine search results, but to review them, tag them, redact or flag them, and otherwise organize them in a meaningful way.
In this post I’ve described a lot about the Discovery part of “Discovery and Response”, leaving out details on how to export content, whether internally or to a third party. Getting the data right, and getting the queries of the data right, is as complex as it is important, and hopefully this post helps make that complexity easier to deal with. The Response part – what do you do with all that data? That will have to wait for another day.