One of the new – err, improved – services announced for Microsoft 365 is Communication Compliance. Extending on its predecessor, Supervision, Communication Compliance supports organizations’ needs to monitor email and chats between employees, as well as with external parties, with new machine-learning (ML) capabilities for detecting threatening language or sensitive data.
Communication Compliance is located in the new Compliance admin center. It is part of the Insider Risk group of solutions, and at the time of this writing, it requires either an E5 license or E3 with Advanced Compliance add-on license.
When you open Communication Compliance, you’ll start at the overview page. Here, you can see at a glance any alerts that are active, the trend of suspected non-compliant activity over time, and see links to get started with creating policies.
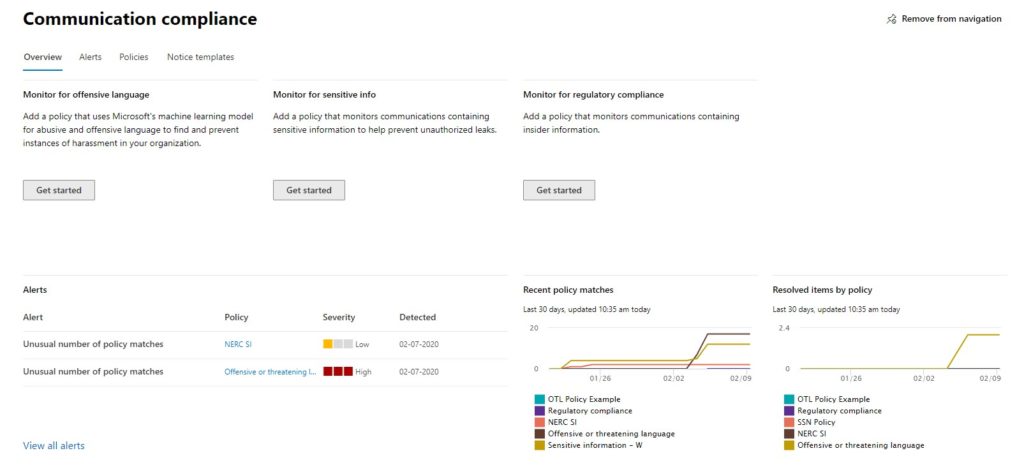
A little below that are some metrics on the policies, including the number of items pending review, by policy. In this example, I have a handful of policies but the ones generating the most activity are: Offensive or Threatening Language, and two sensitive information policies based on different criteria.

Most of the customer use cases for Compliance Communication that I have been involved are based on “Offensive of Threatening Language” – communications that indicate a likelihood of harm or harassment to oneself or to others.
That said, it’s worth pointing out that Communication Compliance can also flag content based on other criteria – emails with sensitive data in them, perhaps sent to an external party.

It’s also worth pointing out that Communication Compliance is a solution for monitoring legitimate communications between employees, or between employees and outside parties. This is not an anti-spam or anti-phishing solution. The latter is better addressed with Advanced Threat Protection and other built-in tools.
Communication Compliance monitors Exchange, Teams, and Skype messages for things like:
- content that matches Sensitive Info Types, i.e. bank routing numbers, social security numbers, or custom types defined by the organization.
- content that matches a classifier, which is a new way to catch content based on machine learning. Several classifiers are included, and customers may create their own.
- content identified by standard properties such as author, subject, size, etc.
- Criteria may be stacked with boolean logic, i.e. “contains social security numbers” AND “resumes” OR is “from hr@contoso.com”.
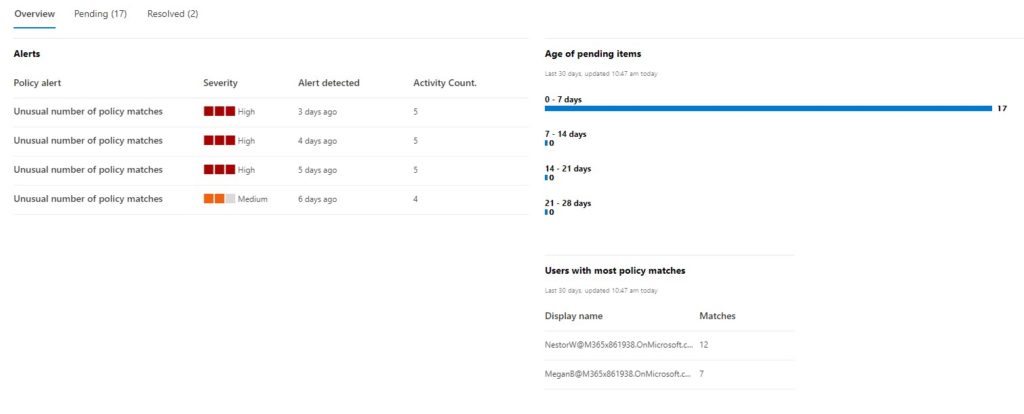
From the overview page, at a glance I can see the most recent alerts and the age of pending items for review. This is the view that someone in a compliance administrator or operator role would have – monitoring periodically to see if there was any activity to address.
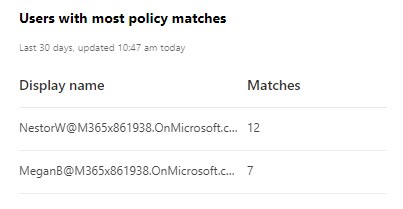
I can also see, on the lower part of the Overview page, who my “problem children” are, i.e. who’s been generating the most policy matches. Looks like I’ll be having a talk soon with Nestor and Megan.
Alerts
When a Communication Compliance policy is created, a corresponding alert policy is created as well. As alert policies are now managed under a separate Policies panel in the Compliance Admin Center, I’m going to carve them out of scope except to say that they can be configured, in particular what the threshold of elements is to issue an alert, as well as the severity level of a given alert.
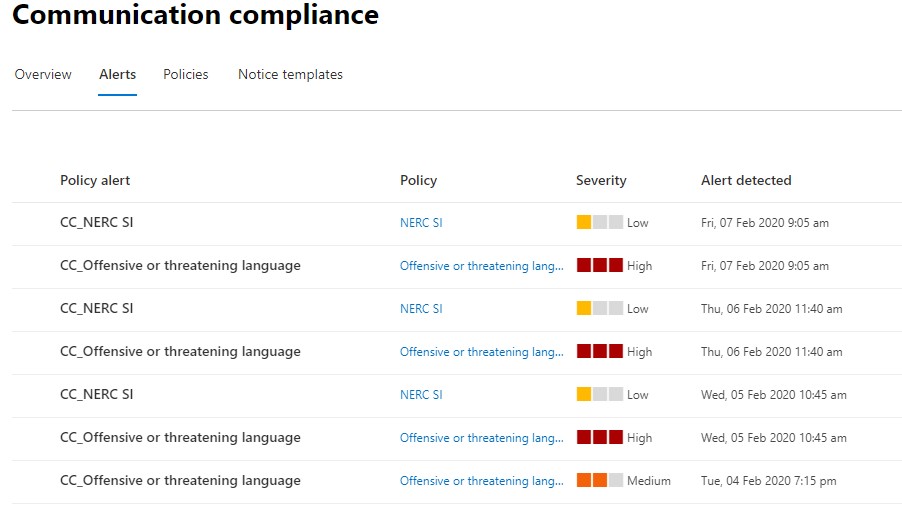
In the following closeup from the Overview page, I see I have a unusual number of matches to two policies in particular: one for communications containing NERC content, and the other for Offensive or Threatening Language.
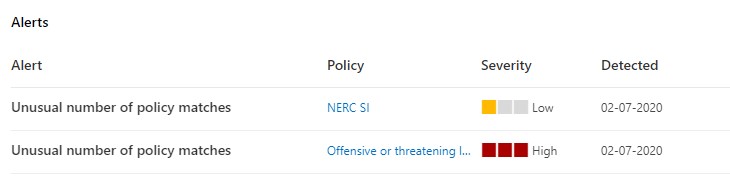
If I jump to the Alerts tab in Communication Compliance I can see my complete list of policy alerts, more or less alternating between the two policies as I tested both at different points in time.
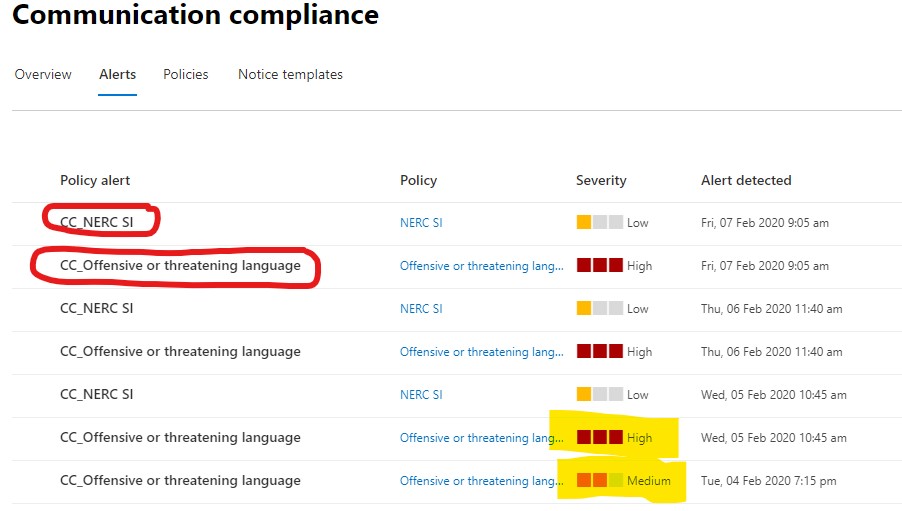
Same picture, now marked up. The policy alert column shows the name of the alert, which by default matches the name of the policy but with CC_thrown in front. I’ve highlighted where I adjusted the severity of the Offensive Language alert from “medium” to “high”, as you can see at the bottom of the picture.
The severity is hard-configured, and is something I changed during testing. It is not a measure of “how much” content was found. Alerts and their settings are deserving of their own post.
So what do you do with an alert? Like the oil light on your car, you probably don’t want to just stare at it and keep driving. Instead, you can open up the policy and view items that are pending, as in the following image.
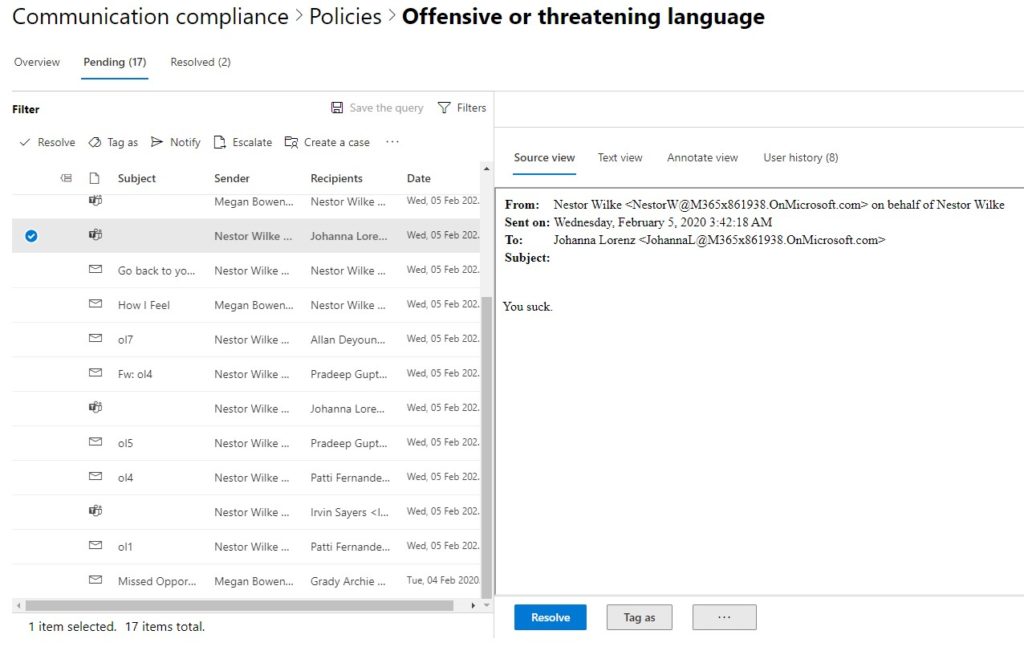
If you are familiar with Advanced eDiscovery, what’s above may look familiar. In this case I have a policy configured to show me every violation, and in short order I created nearly twenty communications that met the criteria for Offensive or Threatening Language (details on that are below). Now, again in my compliance operations role, I’m looking through each of these messages to see if they’re actually offensive or threatening.
*ps notice that I’ve got Teams messages as well as email.
In this interface, I can scroll through each message one by one and see what was written. Just like with Advanced eDiscovery, I can highlight or redact content to help another reviewer spot it. Perhaps in real life the offending material might be buried in some longer emails.
If I Notify someone, I’m sending a note to the original sender using a template defined elsewhere, ala, “hey, an email you sent was flagged as offensive”, etc.
I can also bring in others to look at this. When I escalate I’m essentially inviting someone else to help review this, perhaps my manager or a more experienced colleague.
I can also start an Advanced eDiscovery case using “create a case”. Some customers will keep “bad words” behavior in an HR team, but move to Legal if the behavior is especially egregious or repeat.
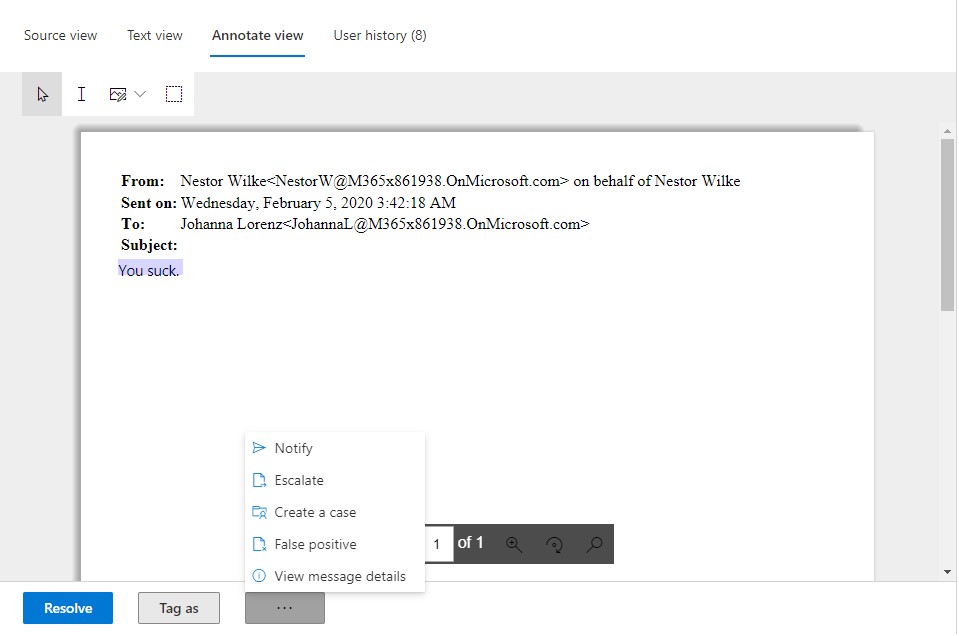
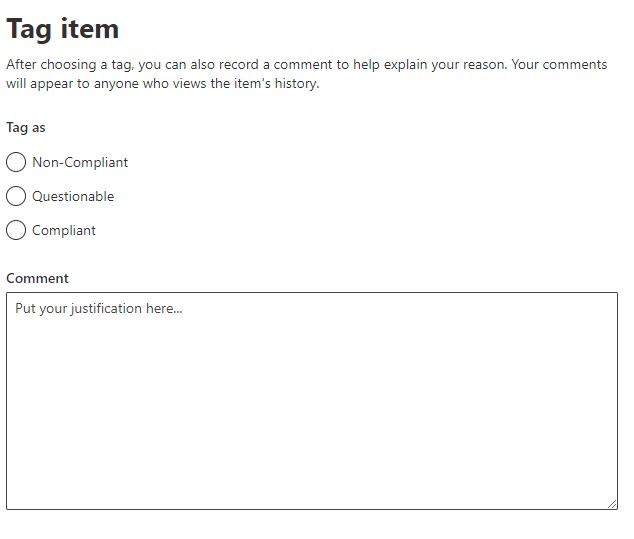
Items can be tagged as well, as non-compliant, questionable, or compliant. Like the dialog says, you can also enter comments to explain why you tagged it a certain way. This doesn’t resolve a case – that doesn’t happen until you click on “Resolve” and choose to mark it one way or the other.
Policies
So what is a policy? This is the meat of Communication Compliance. An operator can do what we’ve seen so far, but an administrator is required to define policies.
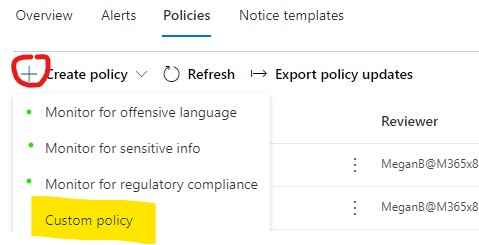
Under the Policies tab, Create Policy. Note that there are three policy templates I marked with green dots, as well as “custom policy” if you prefer to define your own.
The three templates will have certain settings pre-configured. Offensive Language, Sensitive Info, and Regulatory Compliance are common concerns for any organization. The templates are great ways to start monitoring your environment and get started with Communication Compliance, but for demonstration purposes I’ll create a customer policy.
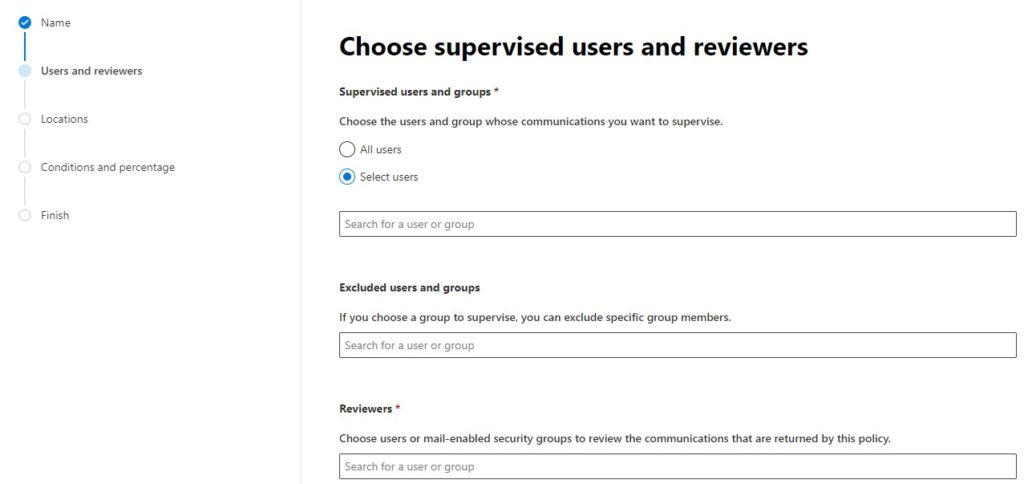
First, give the policy a friendly name and optional description. Then, choose who is supervised, with optional whitelisting of that supervision list, and define who your reviewer are.
A policy can cover all users, or it can target specific users and/or groups. For example, you might have a policy monitoring offensive and threatening language by anyone, but might also have a policy scoped to the sales and marketing team to alert when they use confidential or proprietary content in external communications.
Another use case that comes to mind is from my Supervision days, when I might have a manager overseeing a customer service team, and I want to know if they get a little salty when responding to customers, and if customers get a little salty towards them.
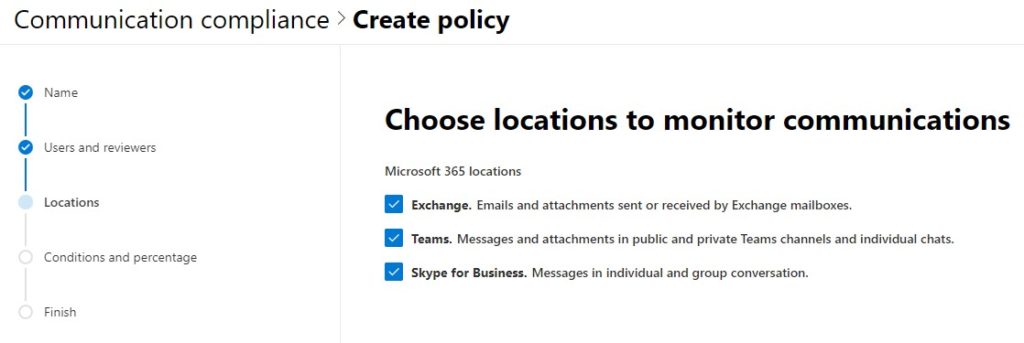
Next, you’re going to set the locations: Exchange, Teams, and/or Skype. Including Teams will include messages and attachments in both public and private channels, as well as individual chats. Including Skype will monitor individual and group conversations.
After setting your users and reviewers, and the locations to monitor, it’s big-brain time: Define your conditions.
First, you can choose whether to monitor communications that are inbound, outbound, or internal. Most customers I have worked with settle for all three, but there are some use cases for monitoring only two or even one direction – see my example above for a customer service center.
Important: Click on Add Condition, under conditions. I drew a red arrow at it. I mention this because I’ve seen two customers blow right past this and create, essentially, policies with no conditions.
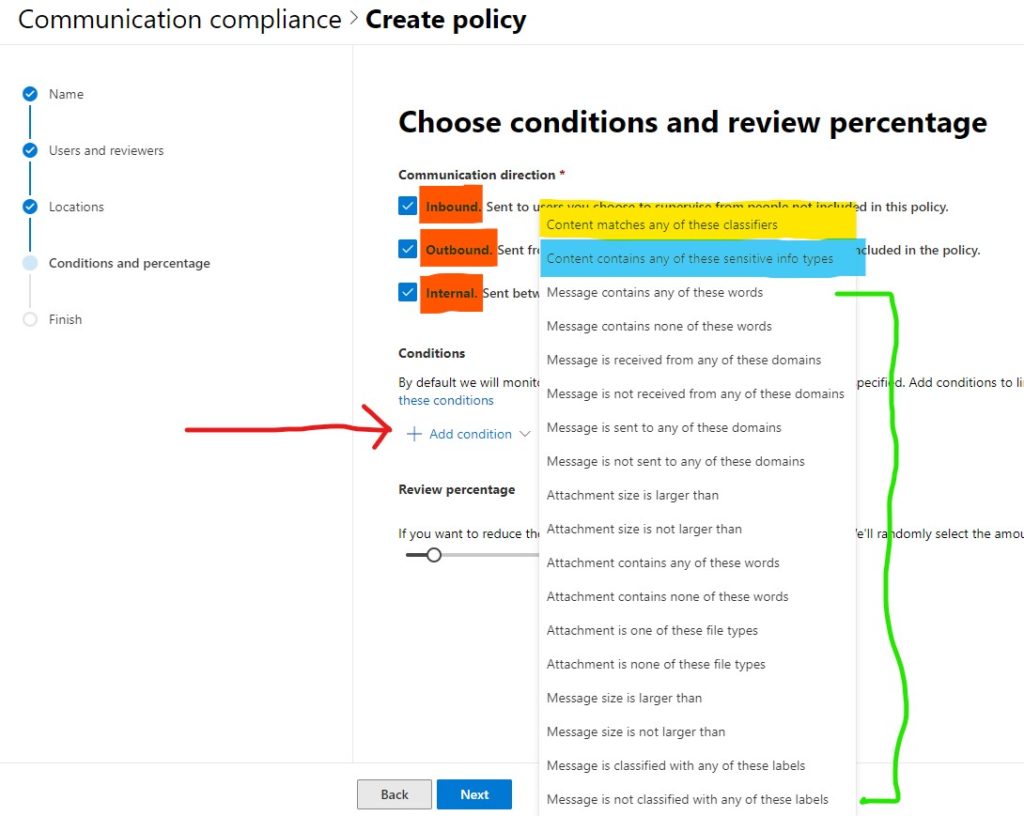
When you click on “Add Condition”, you can set one or more conditions from the list. I highlighted Classifiers in yellow and Sensitive Information Types in blue. Conditions, bracketed in green, are standard SPO/EXO data that can be used independently or alongside the other criteria; for example, content that has ANY of these conditions: content matching a specific sensitive information, content classified with these labels.
Below conditions, you can set the review percentage – basically, how many of these do you want to review? At high volume, low-consequence, you might decide to only review a fraction of what is detected.
However, for testing and early implementation it’s best to set this to 100%, otherwise if you don’t see your test data, it’s hard to know if it’s because the policy is incorrectly configured, or it was just not part of the fraction presented for review.
Classifiers
Classifiers are new. Classifiers use machine learning to detect content based on complex patterns, and they respond to false positives. For example, using some outer-space offensive language, there’s a difference between, “I had a flarkin’ great time” and “you’re a flarkin’ idiot”.
Microsoft provides several classifiers out of the box.
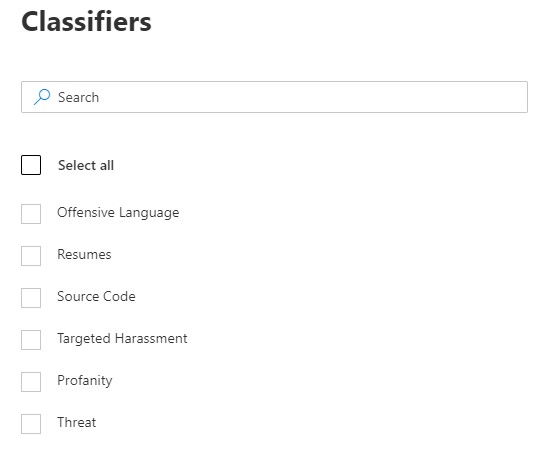
You can create your own as well, by a process that I’ll go into detail about another time. The short version is, you’ll need a few dozen example documents available, set your classifier at them, and then tell it what matches and what doesn’t. The more times it iterates through that process, the more accurate it will be.
Sensitive Information Types
Sensitive Info Types (SI Types) have been around a while, and are the building blocks of the data classification processes that have been in 365 for a while now. These are also worth a post of their own; suffice it to say that Microsoft includes dozens out-of-box, and you can create your own as well.
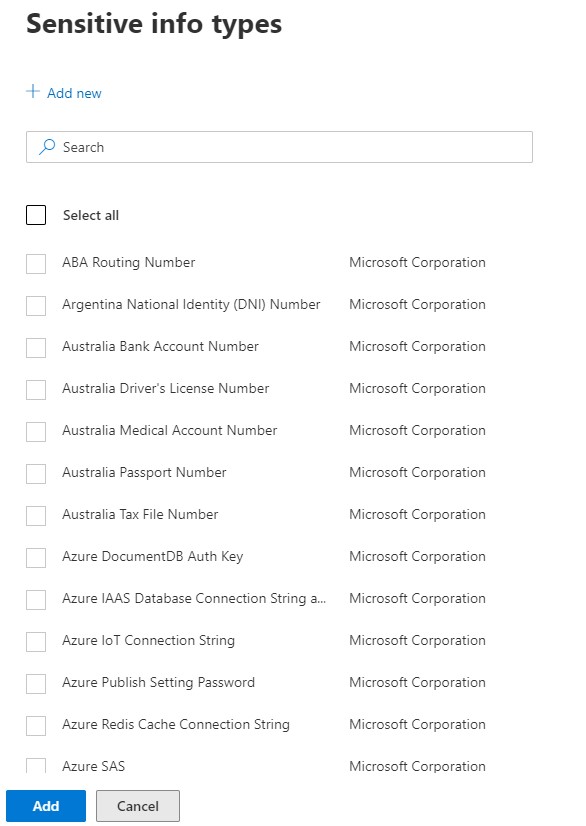
I was excited to see several Azure security-related SI Types appear recently, in case you want to know when your users are sending connection strings or authorization keys around.
Defining Conditions
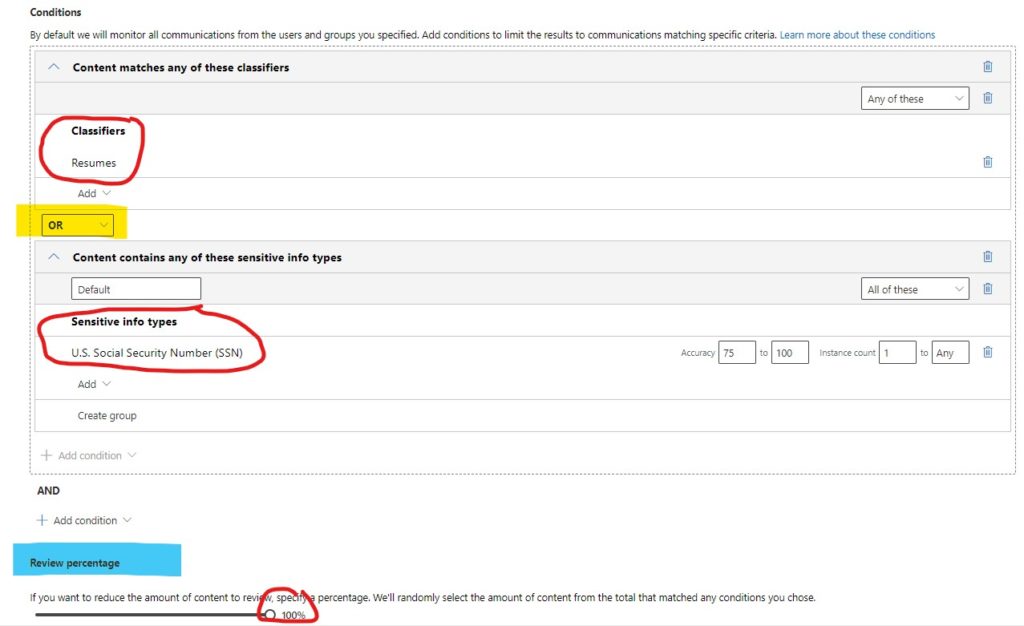
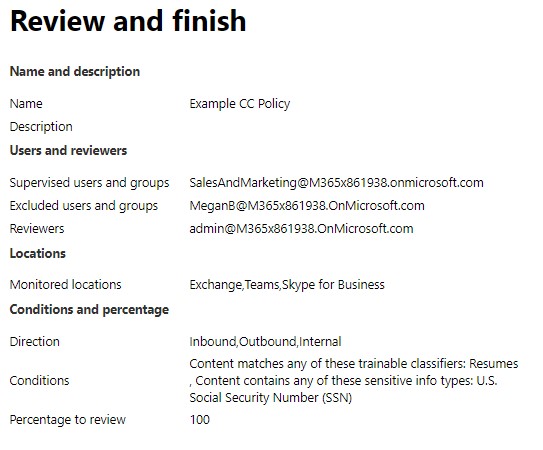
With all of these different criteria available for a policy, it’s easy to get lost in the weeds when talking about how to stack conditions. Here’s a simple example. In this case I want a policy that sets off an alert whenever someone sends a resume OR social security number. I want to catch ’em all, so I set the review percentage to 100%.
First, I’m going to include content that matches the Resumes classifier. This is one of the out-of-box classifiers, and I’m just going to trust that it finds things that look like a resume.
Second, I’m going to reference the US Social Security Number SI Type. This is also an out-of-box way of detecting content, but it doesn’t leverage machine learning. It’s been told what a SSN looks like, and that is all it will ever look for.
Bonus Round: For the SI Type, I can define just how accurate it needs to be, as well as the threshold. For example, one SSN might be OK but ten, a hundred, perhaps not.
In this case though, I am being strict, so I’ve sent the instance count at “1 to any”. I also combined these conditions with a Boolean OR, so either will show up.
Bonus Bonus Round: If I were using multiple classifiers, or multiple SI Types, I have options on the right to search for “any” or “all” of these. When stacking multiple criteria of a type, you’re choosing whether all or only one has to be present. The Boolean on the left just connects the two blocks of condition types.
Finally, like most configuration wizards, review and finish your settings.
Notification Templates
Lastly, before I forget, Communication Compliance has a provision for creating notification templates – the communications that a compliance operator might send out to notify a violator that they’ve broken a rule.
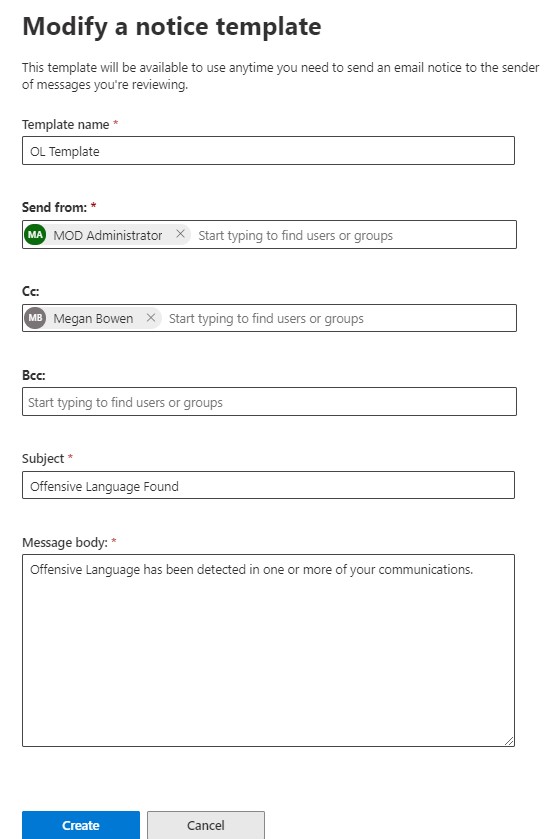
These are important but easily overlooked. All the text should show up in the template. You can use multiple templates to have a set of options for your operators to send. For example: Light Warning, Major Warning, Data Breach Warning as opposed to Offensive Language Warning.
Summary
Communication Compliance is deceptively simple to set up and operate. It’s a great improvement over Supervision, with more robust reporting to go along with improved discovery methods. It supports Teams right out the gate, and the integration with Advanced eDiscovery integrate it more directly with the kinds of workflows organizations have for elevating and managing communications-based insider risk.
Like many of the Security & Compliance solutions, Communication Compliance typically has multiple stakeholders, and requires a bit of forethought prior to implementation. Policies in particular are highly configurable, and it’s not unwise for organizations to expect to adjust their policies over time.
Communication Compliance is non-impactful to users. For example, unlike DLP, it won’t ever prevent a message from reaching its recipient (DLP can be configured to be non-impactful). You can start monitoring communications simply to see what is caught. Most organizations have policies on paper, but have never had the technology to put them fully into practice. Now they do.