In this third and last in a series on Office 365 Labels, I’m going to go into detail about Unified Labels. While I mentioned them in my last post, here I’ll get into more detail about how to adopt them, as well as muse on implications for ongoing management.
For reference, here is the official Microsoft kb article on migrating to Unified Labels.
Unified Labels Defined
What’s “Unified” about Unified Labels? What exactly is being unified? Recall that in Office 365 there are two types of labels: Retention and Sensitivity. Retention labels define how long and how content is retained or disposed of, and Sensitivity labels describe and enforce how content gets handled. Retention labels only apply to content in Office 365.
Sensitivity labels, on the other hand, have had two homes: Office 365 and Azure Information Protection. It’s these two sources of label management that are being “Unified”. Without Unified Labeling, it’s possible for an organization to have one taxonomy for sensitivity in Office 365, and another managed in Azure Information Protection.
This probably grew out of Microsoft’s development processes and sales focus; Office 365 customers needed a way to classify data in Office 365, and non-365 customers needed a data classification solution for Azure Iaas resources. As those two kinds of customers converged, it started to make more sense for the two labeling processes to come together. Hence, Unified Labels.
For brand-new customers, Unified Labeling is probably the way to go. For customers already using labels in either Office 365 or Azure/Microsoft Information Protection, a little thought ahead of time is best, because there may be unanticipated consequences to integrating the two.
Note that it is possible to continue having two separate taxonomic administrations. Unified Labels are an opt-in service. You don’t have to use them if you don’t want to.
Enabling Unified Labels
There is a lot to consider, depending on your starting point. Be sure to read in detail about migration to AIP and Uniform Labels first. Here are the high-level considerations:
- Are Sensitivity Labels already in place either in 365 or AIP?
- Are you already using Rights Management Service (RMS), either on-prem or in Azure?
- Who is going to administer Sensitivity Labels?
- How will end users utilize Sensitivity Labels?
The first point gets to whether or not you’re already using labels one way or the other. The second, whether controls are put in place on the basis of labels. Administratively, if labels are already in use, they are probably manage by one team or another based on where they are administered. Lastly, depending on how labels are implemented, the success of labels in your environment may vary.
As is often the case, the technical aspect of Unified Labeling is much simpler than the administrative and people aspects.
Implementing Unified Labeling
A lot of important details are laid out in the Microsoft kb article I posted up top, so here it is again. Keep it open for reference.
If you are already using labels in either 365 or AIP, you need to understand how the work, and how their scope will change if unified. AIP can extend into non-365 content stores. Labels of either kind can significantly impact user access and interaction with content, so be careful in application.
Further to that point, if you’re already using RMS or some other controls, you’ll need to remove those before throwing AIP-based controls around them.
Administration of labels is key. In my experience, if an organization has both Office 365 and Azure cloud resources, they typically fall to different teams. There’s the 365 team and there’s the Azure team. Within those teams, data classification may fall to smaller groups inside those teams. If there are two organizations, and unified labels are adopted, there must be some agreement on how labels will be managed, and who will have the privileges to do so.
Lastly, the user experience is paramount. Labels affect how users interact with their data. Even if no controls are in place, the very presence of a label or label-prompting might make some users concerned. Having a plan to communicate with and support your user community is very, very important in ensuring successful implementation of labels.
Turn on Unified Labels
To turn on Unified Labels, log in to your Azure environment and go to Azure Information Protection. Scroll down to Unified Labeling on the left.
You’ll need to do this with an account in your environment that has the appropriate privileges. Some older roles are no longer applicable; you’ll need Azure AD roles of Compliance Administrator, Compliance Data Administrator, or Security Administrator at a minimum, or Office 365 roles of Sensitivity Label Administrator or Organization Configuration.
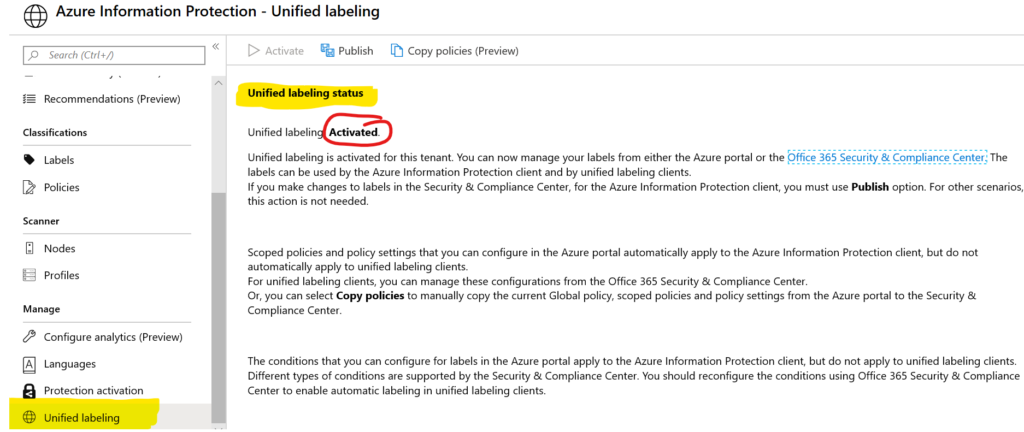
In my environment, I’ve already activated Unified Labeling; to do that I just clicked on Activate, top left-ish. Take the time in your environment to read the detail that follows below.
Now, was that all I had to do? Of course not! To get my end users the full experience they deserved, in both desktop apps as well as Office Online, I had to take some extra steps.
Keep in mind I’ve already set up one all-encompassing sensitivity label policy, which I detailed in my previous post. The labels and policy I want to use are already in place, and I can see them administratively both in Office 365 and in Azure.
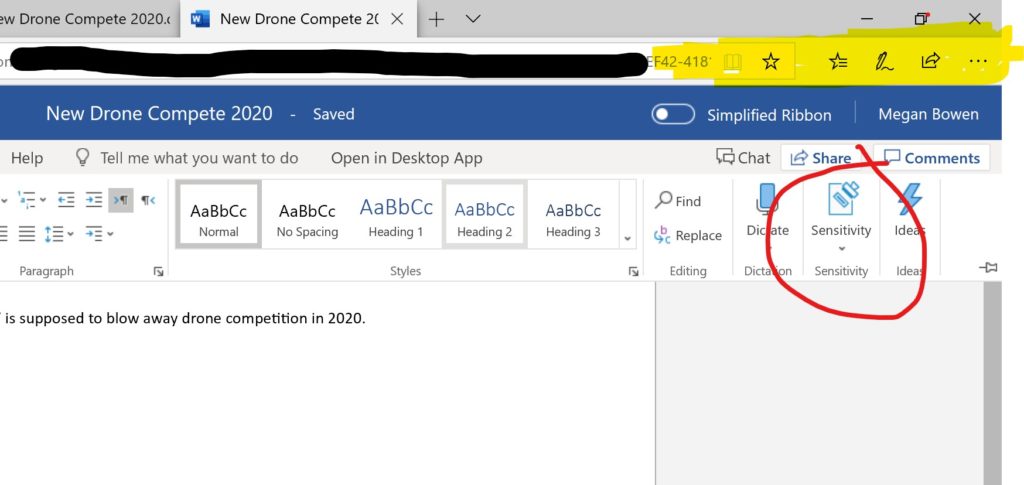
Client for Desktop Apps
In order to make those labels accessible in the desktop applications – Word, Excel, PowerPoint, Outlook – you’ll need to install the local client. Presently (December 2019) this is only available for Windows-based systems – workarounds for non-Windows devices include using the Office Online experience, support for labels in SharePoint and OneDrive (in Public Preview), and automatic labeling.
Once the UL client is installed, your users should get a new Sensitivity panel in their Office ribbon, and can choose to show the label bar.
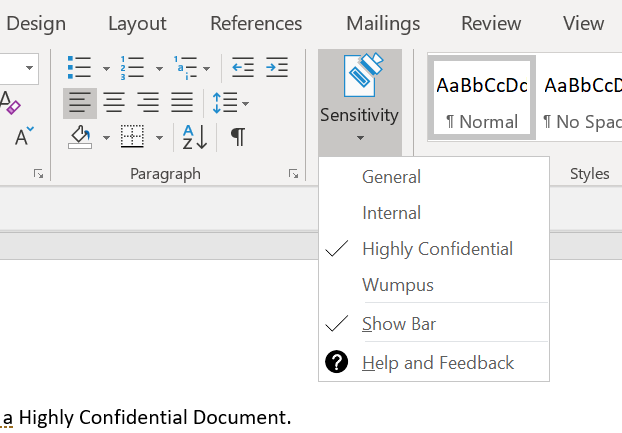

What this allows your users to do is manually assign a label to a document when they create it. If you’re worried about getting a lot of non-labeled content, there is a switch you can throw at the policy level to require a label to be applied, in which case users will be prompted the first time they save the document.
This also applied to emails created in Outlook.
Unified Labeling in SharePoint Online & OneDrive
What’d I mention about Office Online? More accurately SharePoint Online and OneDrive? Well, the good news is that Unified Labels are in Public Preview for those services, and you can enable them with a little extra effort, so that Sensitivity Labels are available to users in the browser experience, as well as the OneDrive sync app, both Windows and Macintosh.
There are some limitations and caveats, so don’t go running off to production without testing first.
Basically, you’ll need to use the SharePoint Online Management Shell. Looks like this once installed and ready to point at your tenant.

You’ll run a cmdlet: Set-SPOTenant -EnableAIPIntegration $true
And, voila, labels show up in Office Online:
Bonus Round: Automatic Labels
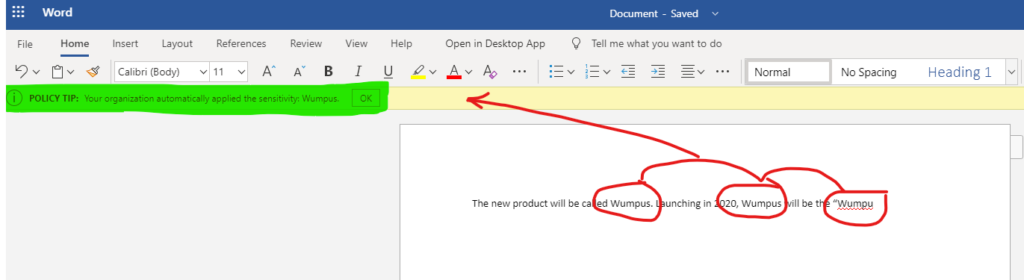
Outside the realm of Unified Labeling, automatic labeling can be applied whether or not you use Unified Labeling. Since I set up my automatic labels though, my screenshots reflect having Unified Labels activated.
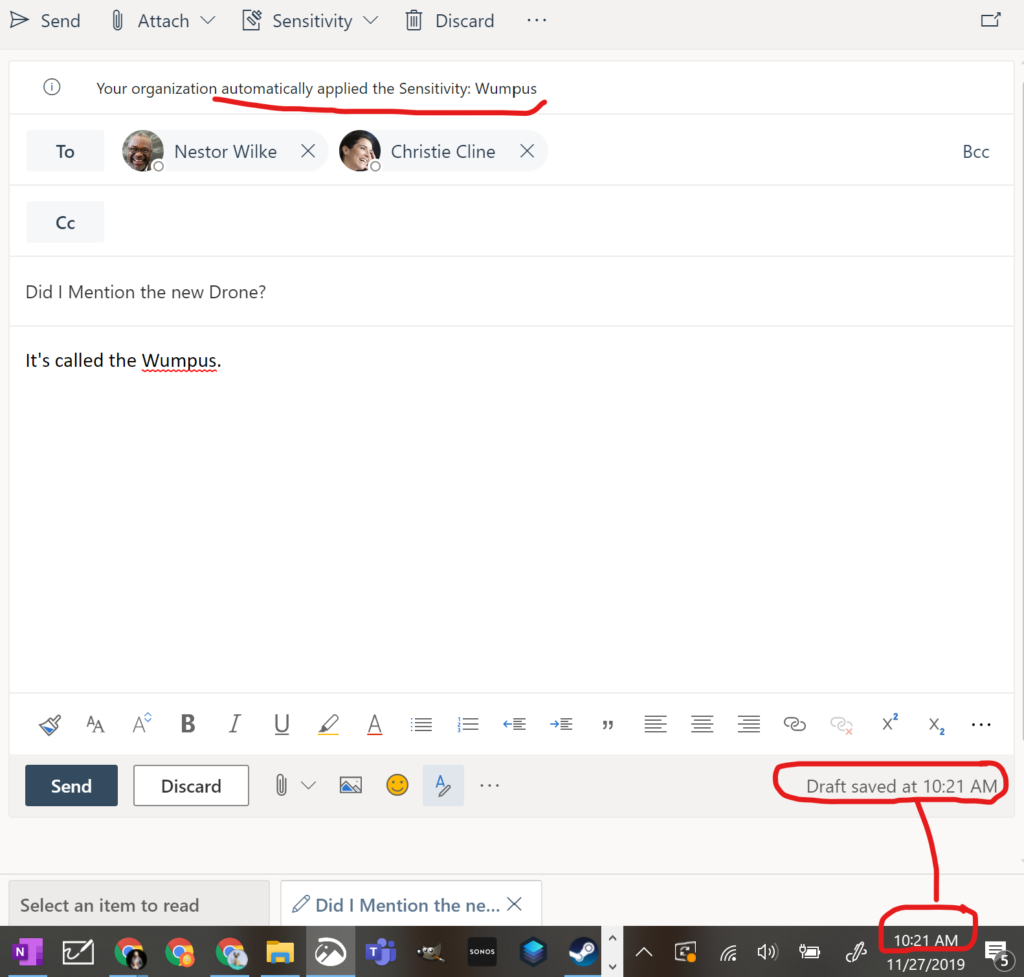
Among my labels is one called “Wumpus”. It’s a simple label, based on the presence of the word Wumpus. Using my classification policy, I can automatically apply the Wumpus label to any document that contains it – even as the user creates the document. As soon as they save, they get a Policy Tip:
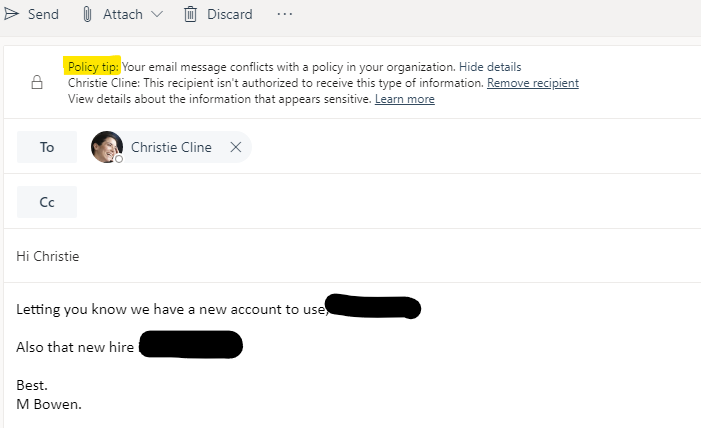
Optionally, I can simply advise a user when they are writing an email. In the next example, I’ve defined sensitive information to include things like bank account numbers and various forms of Personal Identifying Information (PII). When this user writes an email that includes that kind of information, a different Policy Tip shows telling them they’re about to violate a policy.
Lastly, that automatic Wumpus label can be applied to email as well. As soon as a draft is saved, the label gets applied. It gets applied if sent, as well.
Summary
Sensitivity Labels have been a powerful part of Office 365 and Azure classification services. Until last year, there were two places to manage labels, which required some awkward decisions by organizations around their data classification. With unified labels, Microsoft has centered the management of sensitivity in one place, simplifying management and hopefully, facilitating adoption.
To use unified labels, and organization should consider their taxonomy and decide who will be responsible for maintaining it, as well as who will operate it. A good communication plan, along with the deployment of appropriate agents and service enablement, will be required for a successful deployment.